All Pokémon have six stats, they are: HP, Attack,
Defense, Special Attack, Special Defense, and Speed.
HP (Health Points): Is simply how much damage a Pokémon can take before being defeated.
Attack affects how much damage a Pokémon can inflict with physical attacks.
Defense reduces how much damage a Pokémon takes from physical attacks.
Special Attack affects how much damage a Pokémon can inflict with special attacks.
Special Defense reduces how much damage a Pokémon takes from special attacks.
Speed determines which Pokémon will move first in battle.
Each stat has a value and generally the higher the
stat the better the Pokémon. To get a perfect Pokémon we are going to want to optimize all of these stats (or at
least the ones that matter) that way our Pokémon will be the best that it can
be. So how do we do that? Well the value of each stat is determined by the
following four factors:
Base Stats: This is the only one of the four we cannot control. Base Stats are determined by the species of Pokémon, for example Pikachu has a base speed stat of 90 while Charizard has a base speed stat of 100. If both of these Pokémon are trained in an identical manner then the Charizard will always be faster because its base speed is higher.
Individual Values (Usually referred to as IVs): This is the trickiest one of the bunch. Individual Values exist so that theoretically all Pokémon will be unique. They are values that range from 0-31 that a Pokémon gets for each one of its stats as soon as it is generated. At level 100 the IVs translate directly into points If you go catch two wild Pikachu odds are you will notice they have different stats even though their base stats are the same, this is the work of IVs. When we talk about a perfect Pokémon we mean a Pokémon that has the IVs we want in all of its stats (Usually we want 31s but there are exceptions). IVs are why we breed Pokémon; breeding is the only way to have any control over a Pokémon’s IVs. Once the IVs of a Pokémon are set they can never be changed.
Effort Values (Usually referred to as EVs): Unlike IVs EVs are not generated at birth and for that reason they are much more easily manipulated. A Pokémon gains EVs every time it gains experience from battling a Pokémon. Each species of Pokémon gives some base amount of EVs upon being defeated, for example when defeated a Pikachu gives 2 speed EVs. By defeating many Pikachu your Pokémon will gain many speed EVs which will result in a higher speed stat. There are limitations however, a Pokémon can only accumulate a total of 510 EVs and only up to 252 in a single stat. At level 100 a Pokémon will gain one point in a stat for every four EVs put into it. It is possible to remove EVs from a Pokémon allowing you to redo them if you mess up, but that can be a pain so it is best to just do it right the first time.
Natures: Last but not least is natures; every Pokémon is born with one of 25 possible natures. Each nature raises one stat (except HP) by 10% and lowers another stat by 10%, with five natures being neutral. Almost always you will want a nature that boosts the stat you most care about and lowers the one you least care about. Natures like IVs cannot be changed once they are determined but they are easily manipulated through breeding.
So I came up with this team that uses Prankster Liepard with Assist on a team that only allows it to get Spore from using Assist (essentially creating a priority Spore). It's pretty cool and would be much more deadly if it weren't for the Sleep clause. Anyways here is the team:
Mew @ (No Item)
Trait: Synchronize
EVs: 252 HP / 4 Def / 252 Spd
Timid Nature (+Spd, -Atk)
- Thief
- Transform
- Trick
- Metronome
Wobbuffet (M) @ Leftovers
Trait: Shadow Tag
EVs: 28 HP / 252 Def / 228 SDef
Bold Nature (+Def, -Atk)
- Counter
- Mirror Coat
- Destiny Bond
As I said the sleep clause prevents this team from being ridiculously strong but it is still a lot of fun to use. One of it's greatest weaknesses is opposing substitutes since they block transform and status ailments and because there are almost no direct attacking moves on the team.
I'm working on making this team in-game right now, after which I imagine it will be a beast in random wi-fi where there is no sleep clause.
Anyways here is a video of it in action on Pokemon Online, sorry the video has no music or narration so it is sort of dry, but hopefully you can appreciate the strategy going on.
Using the proper held items is essential to competitive pokemon battling. As was seen in my battle videos from my last post a held item can determine the outcome of a battle. Items are also going to play a role in how we set up our teams because in most forms of competitive play you can't have multiple pokemon using the same item. This will force us to have a little more variety in our pokemon's strategies. For this post we will take a look at the competitive applications of many different items.
First up are the original hold items, berries! Most berries are not super useful, but there are a few that can be used competitively. First of all is the Lum Berry which cures any status ailment. Lum Berry can be used on pokemon who need the protection from status, pokemon who would be crippled by paralysis, burn, or poison could all conceivably use Lum Berry. Lum Berry mostly outclasses all other status cure berries since it protects against all status ailments, but there are a few exceptions. Mainly Chesto Berry could be used over Lum Berry on a pokemon that uses Rest because that would guarantee the berry wasn't used up by some random status condition. You could also maybe use a Prism Berry over Lum Berry with a pokemon that uses Outrage since t would guarantee the pokemon to snap out of confusion, but it is questionable if this would ever merit its usage. The other type of Berry that could be used competitively is a Berry that halves damage from a super effective hit. There is a berry of this type for every type of attack, but the most commonly used are the Shuca and Yache Berries for the resistance they give to Ground and Ice moves respectively (the Shuca berry falling in use thanks to the Air Baloon). These berries can be used on pokemon with 4x weaknesses to a certain type of attack, most notably the Yache Berry can be used on Garchomp and other Dragons who are otherwise devastated by a doubly super effective Ice attack. Other than those, the Sitrus Berry is almost always outclassed by Leftovers and the Oran Berry only has a use in Little Cup. The berries that I didn't otherwise talk about are pretty much useless and so shouldn't be used.
Next we have Leftovers which is an incredibly useful held item for most any pokemon whose focus is on longevity such as a wall. Leftovers restores 1/16 of a pokemon's max HP every turn which can have a big effect on pokemon like Blissey. Leftovers is often used with pokemon who also use moves like Toxic that cause residual damage to the opponent. Along with the usage of Protect a bulky pokemon can stall an opponent until they faint. Basically any pokemon that is planning on a long battle can make good use of Leftovers.
In the same way that Leftovers is a standard for Defensive Pokemon the Life Orb is a standard among offensive pokemon. Life Orb increases the power of all damaging moves by 30% making it more powerful than any other power boosting item (excluding Choice items). The only downside to using it is that it takes away 10% of the users HP every time they hit an opponent with a damaging move. But most offensive pokemon will not mind the 10% hit in exchange for the damage with the only exception being for bulky sweepers. A Life Orb is almost always a fine choice for a sweeper if you do not have other plans.
Another option for offensive pokemon is either the Choice Band or the Choice Specs, Choice Band for physical attackers and Choice Specs for special attackers. These Items give a 50% boost to their respective attack stats but lock the holder into using the first move they use. Choice Items can be used on pokemon with powerful coverage moves. But a pokemon with a choice item needs to be ready to switch out often since being locked into one move can be a major pain. Another option for a choice item is that it can be tricked onto an opponent's pokemon to cripple them by trapping them into only one move, this is especially deadly to pokemon who need to set-up.
The third Choice item is the Choice Scarf. The Choice Scarf is the most used Choice Item giving a 50% boost to the all-important Speed stat. The Choice Scarf can be used on powerful, but slow pokemon to allow them to out-speed usually faster threats. It can also be used to make a fast pokemon nearly impossible to out run. It can be used effectively on many sweepers as well as for tricking onto opponents. Regardless it still carries the same weaknesses of the other Choice items.
The Expert Belt and Type Boosting Items are another, usually less preferred, option for attacking pokemon. These items give a 20% boost to the power of attacks without drawback except for that they only work in certain conditions. The Expert Belt only gives the 20% boost when an attack is super effective and the type boosting items only give a 20% boost when using a specific type of attack. Of these two the Expert Belt is more often preferred but they are only useful if the Life Orb is not an option.
Gems (sorry no picture) are yet another option for attackers. Gems come in every pokemon type and boost the power of a move of that type by 50%, but only once. Gems have the benefit of being as powerful as a Choice boost with out locking you into a single move. The downside of course is that they are only good for one use and for this reason they tend to be used more in doubles/triples where matches tend to be shorter.
Focus Sash is a great item to be used by any frail pokemon. A Focus Sash guarantees that a pokemon with full health will survive any attack with at least 1 HP. This means a pokemon can use it to ensure they get a chance to set-up or a pokemon could use it to take down a pokemon that could usually out-speed and OHKO them. The one concern about the Focus Sash is that if it is not used early on then there is an increasing chance of it being broken by entry hazards such as Stealth Rocks.
Eviolite (sorry again no picture) is an item that has made many not fully evolved pokemon viable options in competitive battling. It grants its holder a 50% boost to both of their defenses so long as they can still evolve. This has made pokemon like Chansey and Porygon2 as useful as their evolved forms. The biggest drawback to the item is that the pokemon cannot use another item which can be a painful loss,
Air Balloon (another item I couldn't find a picture of) is a great item for many Fire, Steel, and Rock pokemon. The Air balloon grants immunity to Ground moves but pops when the pokemon is hit by another move. This allows pokemon like Heatran to switch in on pokemon they otherwise couldn't and forces the opponent to spend a turn popping the Air Balloon. Like Eviolite, Air Balloon's biggest weakness is not allowing you to use a more conventional item, but still it can be very useful on pokemon usually destroyed by Ground moves.
The Flame Orb and Toxic Orb may seem like horrible items since they burn and badly poison you, but they have uses. For one they can be used to boost the power of pokemon with the ability Guts and/or the attack Facade, things that get stronger when the pokemon has a status ailment. They also serve as protection from other status ailments though they should never be used for that purpose alone. Toxic Orb is particularly useful on pokemon with the ability Poison Heal. For them not only does Toxic Orb restore twice the HP as Leftovers but it also prevents any status ailments.
Two more items that seem terrible at first look are the Iron Ball and Lagging Tail. The Iron ball halves speed and negates any immunity to Ground moves a pokemon might have while the Lagging Tail makes the pokemon move last no matter what. These items have basically two uses, for one they can be tricked onto a foe crippling their speed. For two, Iron Ball can be used with the move Fling to create a massively powerful Dark type attack (that doesn't work with Lagging Tail). That's all they are good for.
Light Clay serves only 1 purpose, but is useful for that purpose. Light Clay extends the duration of Reflect and Light Screen to 8 turns instead of 5. Light clay can and often is used on pokemon that set-up dual screens, but there is obviously no other use.
The Heat, Icy, Damp, and Smooth Rocks can all be used on weather teams though they are generally made obsolete by pokemon who automatically induce weather. There is a Rock for each type of weather and they each increase the duration of that weather to 8 turns. They can sometimes be used on weather teams by pokemon who set-up weather, but again they aren't that useful if you can use a pokemon that automatically sets-up eternal weather.
Bright Powder can be used by evasive pokemon, but it is banned under Smogon's rules. Bright Powder decreases the opponent's accuracy to 90% which by itself is not terrible but when added with other evasive boosts becomes quite obnoxious. Pokemon with Sand Veil, pokemon with Minimize, or any other pokemon that abuses evasion could hold Bright Powder. If you want to use it I say go for it, but you will probably get many rage quits.
Okay well there are a few other items that could maybe under some specific circumstances be used, but for the most part I think I covered the main items you will see and use in competitive battles. here is a link to a complete list of items: http://veekun.com/dex/items/misc
Sorry no video this time, I didn't think it was necessary. If you want though take another look at my videos from the last post and pay attention to how the items come into play.
Next post I'm thinking I tie things together with an explanation on battling. I'm not sure how much there is to say about it though and I have already mentioned a lot, so I guess we will see.
Now that we know how to train Pokemon it is time to talk about putting a team together. This is a tricky topic though because the perfect method has not really been found which is apparent when you see the wide variety of teams that people use. I myself am no great authority on the matter, if I was you would think I could at least get 1st in a regional VGC tournament. But regardless there are some basics that I should be able to help with and that will hopefully help you be a strong competitor in the competitive scene.
Before you can begin you have to decide what format you want to play in. How you build a team will be greatly altered by how you intend to play. If you play by Nintendo rules, generally via random Wi-Fi match-up, then these are the different play styles you can choose:
Singles: You use three pokemon from your team and you batlle 1 on 1.
Doubles: You use four pokemon from your team and you battle 2 on 2.
Triples: You use all six pokemon from your team and you battle 3 on 3.
Rotation: You use four pokemon from your team and you battle 3 on 3 rotation. What this means is that you have three pokemon out, but you battle 1 on 1 what's different is that you can rotate into and attack with one of your other pokemon all in one turn.
Launcher: Same as Triples except you can use items. The way you use items is different from normal having to earn them through battle.
All Nintendo rules share the following bans.
You may not use any of the following pokemon: Mewtwo, Mew, Lugia, Ho-Oh, Celebie, Groudon, Kyogre, Rayquaza, Jirachi, Deoxys, Chatot*, Dialga, Palkia, Giratina, Phione**, Manaphy, Darkrai, Shaymin, Arceus, Victini, Reshiram, Zekrom, Kyurem, Keldeo, Meloetta, and Genesect.
* you may be wondering why Chatot would be banned, but the reason is to prevent people from abusing Chatter online. Chatter is a move only Chatot can use that allows you to record your voice which will then be used when you use the attack.
** Phione may also seem like a weird ban, but the reason for it is that Phione is impossible to obtain without Manaphy who is event only.
In addition to the Pokemon bans, the moves Sky Drop and Dark Void are banned. Sky Drop because of an exploitable glitch and Dark Void probably for being over powered as it can put both opposing pokemon to sleep in a double battle.
If you play Pokemon Online (or Smogon rules) you have to choose the Tier you want to play in. Under these rules you generally use all six of your pokemon, but certain Tiers will be different. The most basic Tiers are these:
Uber: Pokemon banned from all other tiers for being too powerful, This list is similar to Nintendo's ban list in that many of the cover legendaries and event only pokemon are in this tier. But it is not exactly the same because it is based on power meaning that some of the cover legendaries and event pokemon are not in this tier and a few normal pokemon like Garchomp are.
OU: Short for Over Used. OU is the most commonly played tier allowing all Pokemon except those in Ubers.
UU: Short for Under Used. UU bans pokemon from the OU and Uber tiers.
RU: Short for Rarely Used. Is a new Tier as of the 5th generation. It bans pokemon in UU, OU, and Ubers. May also be refered to as LU for Lesser Used.
NU: Short for Never Used. NU bans all pokemon from RU and above.
LC: Short for Little Cup. LC is only for unevolved pokemon.
Once you pick your play style you can begin to build a team. If you are playing with Tiers keep in mind that while you don't have to stick to pokemon within the Tier (in some cases you shouldn't), you also don't want to have too many pokemon from lower Tiers. And as a rule of thumb you usually don't want to drop more than one Tier, so if you are playing Ubers you should be using Ubers and OU pokemon, if you are playing OU you should be using OU and UU pokemon, etc.... Similarly if you are playing Nintendo rules you should probably stick mostly with pokemon who are found in the Uber (when applicable), OU, and UU Tiers.
Regardless of what play style you choose the one thing to keep in mind when building a team is synergy. Synergy can me a lot of different things, but the most basic thing is type synergy. Generally you don't want your team to consist of one type of pokemon (with weather teams maybe you could), but rather your team should be full of pokemon that cover each others weaknesses. For example, if you use a pokemon like Heatran with a 4x weakness to Ground moves then include a Flying type or pokemon with Levitate on your team. This principle applies to other types as well if you have pokemon weak to Fighting moves then include a ghost, if you have pokemon weak to Electric then include a Ground type. Part of the point to having this coverage is that it allows you to safely switch out pokemon, in some cases you can get a free switch in if your new pokemon is unaffected by your opponent's attack. You don't have to stop an attack completely though, if you have a Garchomp or Dragonite with 4x weakness to Ice then you could include a Heatran on your team who takes only a quarter damage from Ice moves. Here is the type chart; remember that many pokemon have two types in which case damage multipliers stack (both types weak to the attack = 4x damage, 1 type weak and 1 type normal = 2x damage, 1 type weak and 1 type resistant or both types normal = 1x damage, 1 type resistant and 1 type normal = .5x damage, both types resistant = .25x damage, 1 type immune = 0x damage other type doesn't matter).
In addition to type there are a few abilities that grant immunity to certain attacks. The most common of these abilities is the Levitate ability which grants immunity to Ground type attacks, but other ones are Flash Fire (absorbs Fire attacks nullifying damage and boosting the strength of your own Fire moves by 1.5x), Lightningrod (redirects Electric attacks to the pokemon and then absorbs them giving a 1 stage Speed boost), Volt Absorb (absorbs Electric restoring HP by 25% when hit by one), Water Absorb (absorbs Water attacks restoring HP by 25% when hit by one), Dry Skin (works the same as Water Absorb, but the pokemon also takes 1.25x from Fire attacks, causes 12.5% damage each turn in strong sunlight, restores 12.5% HP every turn in rain), Motor Drive (works the same as Lightningrod, but does not redirect attacks), Storm Drain (redirects Water attacks to the pokemon and then absorbs them giving a 1 stage Special Attack boost), Sap Sipper (absorbs Grass attacks giving a 1 stage Attack boost), and Wonder Guard (Grants immunity to all attacks that are not super effective, Shedinja only).
Type synergy is important to singles, doubles, and triples in different ways. In singles it is important for making effective switch-outs which can really make or break a match. In Doubles and Triples you have to think more about how types will work together in battle. Switch-outs aren't quite as important in doubles or triples because it is much harder to perform an effective switch-out when your opponent has two or three pokemon on their side of the field waiting to attack. Instead you often have to worry about how one of your pokemon's moves will effect the other. For example, you wouldn't want a pokemon like Garchomp who uses Earthquake (a powerful Ground moves that hits all other pokemon in a double battle) to be paired with a pokemon like Heatran who has a 4x weakness to Ground. A good example of type synergy would be something more along the lines of a Garchomp and Thundurus, Garchomp can freely use Earthquake because Zapdos is part Flying and Thundurus can freely use Discharge because Garchomp is part Ground.
In addition to type synergy you need to consider the roles your pokemon will play in battle. Here are the different roles a pokemon will usually play in battle:
Leads: A lead is the first pokemon you send out into battle. A lead will usually try to accomplish one of two things. The first thing they might do is to try and set-up for the rest of the match. Set-ups include using Spikes, Toxic Spikes, and/or Stealth Rocks to damage the opponent every time they switch pokemon into battle, a pokemon might set-up Reflect and/or Light Screen to halve damage taken, or they could set-up weather for the numerous benefits it provides. The second thing a lead might try to do is take down the opponent's lead to prevent them from setting up. Often the lead will play another role too, in the case of a set-up lead it is common for them to be walls while the other type of lead will tend to be a sweeper both of which I will talk about in a bit. Leads are not quite the same in doubles and triples, you won't see nearly as many stealth rocks or spikes users. You don't see a lot of screens, but then you don't see them too often in singles either. Weather is still fairly common, but that is because most weather leads set-up weather automatically with an ability. Some common leads are Ninetales, Politoed, and Tyranitar (Ok these are the weather leads, but still they are extremely common).
Sweepers: A sweeper is a pokemon that tries to take out as many of the opponent's pokemon as possible. There are a few different types of sweepers which are physical, special, mixed, and bulky. Physical and Special sweepers function in the exact same way the only difference being who they are able to sweep, obviously the physical sweeper can be stopped by the right physical wall and the special sweeper can be stopped by the right special wall. Mixed sweepers carry both physical and special moves to try and take care of both pokemon who are defensive and pokemon who are specially defensive. The down side? Well you can only optimize 2 stats through EVs and it is common to have a nature that reduces the unused attack stat, so a mixed sweeper will usually suffer somewhere else. All these types of sweepers usually have at least one high attack stat and a high speed. Their goal is to wipe out their opponent before they get touched since they often have less desirable defenses. The exception is the bulky sweeper who is designed to take a few hits while still being able to take down the opposing pokemon. Bulky sweepers often give up speed for the bulkiness. Many times sweepers will want to set-up first, many physical sweepers will use Swords Dance to double their attacks and many Special sweepers will use Calm Mind or Nasty Plot to boost their Special Attacks. Bulky Sweepers can sometimes use moves like Rock Polish to increase their speed. Sweepers won't always set-up but it is not uncommon. Some common sweepers are Salamence, Haxorus, and Hydreigon.
Walls: A wall is a pokemon that is designed to take hits. Just like with sweepers there are physical, special, and mixed walls. Walls generally have large amounts of HP and at least 1 high defense stat. Often times walls will try to take down there opponents by slowly sapping away their health. To achieve this they commonly have attacks like Toxic or Leech Seed. Another trait of walls is that they usually have a means of restoring their health. This can be as simple as having them hold leftovers, but it can also be achieved with a recovery move, Leech Seed, or a mix of all these things. Some common walls are Gliscor, Blissey, and Ferrothorn.
Support: A support pokemon is a term that broadly names many different types of pokemon that help the team indirectly. To name just a few you can have Baton Passers, Medics, and Cripplers, but there are many more. I would like to tell you what your usual support pokemon is like, but I can't because it depends completely on what pokemon it is and what they are trying to accomplish. Instead I will just explain what some types of them try to do. A Baton Passer uses the move Baton Pass to give stat boosts or other helpful status effects to another team member. As of this generation the new move Shell Smash has become a popular choice for Baton Passers, Shell Smash increases Attack, Special Attack, and Speed by 2 stages each at the cost of decrease in Defense, and Special Defense of 1 stage. Passing Shell Smash to a sweeper can create a deadly pokemon who is both extremely fast and powerful. But there are other things that can be Baton Passes too. Baton Pass can be used to pass Nasty Plots, Swords Dances, Speed Boosts, all sorts of things. Next after Baton Passers are Medics, ok I actually just made that term up but you will probably see them referred to as Clerics or wish-passers depending on what they are actually doing. This type of pokemon is one that can heal your other pokemon in one way or another. This is usually in one of two ways either they cure status conditions with Aromatheropy/Heal Bell or else they restore HP with the move Wish. The Last type of support I will talk about is a crippler. A crippler through one way or another stops the opponent from doing what they would like to. There are several ways a pokemon can do this, one way is by inflicting Parafusion (Both Paralysis and Confusion). A pokemon who is both Paralyzed and Confused will have a very difficult time attacking because 50% of the time they will damage themselves due to confusion and 25% of the time they get through confusion they will be immobilized by the Paralysis (not to mention the severe loss of speed). Another way you might cripple a pokemon is through Taunt. Taunt won't work to cripple Sweepers, but it is devastating to pokemon that use status moves. Taunt prevents any sort of set-up because it bars the usage of all non-damaging moves. A third way of crippling an opponent's pokemon is the move Trick. Trick switches items with the opposing pokemon which has some tricky applications. A common way of using Trick is with a pokemon that is holding a Choice Scarf. Choice Scarf only allows the pokemon holding it to use one move making it a great thing to Trick onto a pokemon who uses a set-up move. An alternative to a Choice Scarf would be an Iron Ball or Lagging Tail. These items severely cut speed (actually Lagging Tail makes the pokemon go last no matter what) making these a great choice to Trick onto a quick sweeper. There are probably even more ways to cripple, but you get the idea. Like I said before there are many other types of Support that you will have to discover on your own but that is a good start. There are many pokemon who can function as support, but here is a very small sample Gorebyss, Smeargle, and any pokemon with Prankster.
Many pokemon will not clearly fall it to one of the categories I named above, many can fulfill multiple roles and others may play a role different from what I described. Just remember that you don't want all your pokemon to play the same role. Don't build a team of sweepers and don't build a team of walls, a good mix is usually best.
Another thing to keep in mind when building a team is your pokemon's move sets. move sets are way to big a topic for me to try and explain all about them. The right move set varies quite greatly from one pokemon to another so if you are having trouble coming up with them check Smogon's suggestions http://www.smogon.com/bw/pokemon/, but remember that Smogon's sets are designed for Smogon's metagame which among other things is focused on singles. But the reason why I'm bringing up move sets now is to tell you to try and not have redundant move sets on your team. For example as great of a move as Earthquake is you don't need every pokemon on your team to know it. This topic relates to type and role synergy, but more than that you just want to be sure that your team has plenty of coverage. That is coverage against types as well as coverage against strategies.
I'm close to wrapping this thing up, but there are a couple of teams that have a special kind of synergy I want to talk about, namely weather teams and Trick Room teams. The reason I want to talk about these teams is that they work together a little bit more than normal teams requiring greater synergy. Here they are:
Sunny Day Teams: Sunny Day teams usually consist mostly of Fire and Grass type pokemon. They thrive because of the 50% boost to the power of Fire attacks, the halving of the power of Water attacks, the instant access to the powerful Grass move Solarbeam which usually has to charge a turn, and because of several sun related abilities. Sun related abilities are Drought (causes eternal sun upon the pokemon switching into battle), Chlorophyll (doubles speed in the sun), Solar Power (Increases Special Attack by 50%, but inflicts 1/8 max HP damage at the end of every turn in the sun), and Leaf Guard (prevents status ailments in the sun).
Rain Dance Teams: Rain Dance teams usually consist mostly of Water and Electric pokemon. They thrive because of the 50% boost to the power of Water attacks, the halving of the power of Fire attacks, the perfect accuracy of Thunder in the rain, and again because of several rain related abilities. Rain related abilities are Drizzle (causes eternal rain upon the pokemon switching into battle), Swift Swim (doubles speed in rain), Hydration (cures status ailments in the rain), Dry Skin (restores 1/8 of HP every turn in rain, among other things), Rain Dish (restores 1/16 of HP every turn in the rain).
Hail Teams: Probably the least common weather team, they usually have many Ice type pokemon. Hail teams thrive because of the 1/16 HP damage hail deals to non-Ice pokemon every turn, the perfect accuracy of Blizzard in the hail, the ability Snow Warning that causes eternal hail upon the pokemon switching into battle, the ability Ice Body which restores HP by 1/16 every turn in the hail, and because of the ability Snow Cloak that boosts evasiveness in the hail.
Sandstorm Teams: Sandstorm teams usually consist mostly of Ground, Rock, and Steel pokemon. They thrive because of the 1/16 HP damage dealt to all pokemon who are not Ground, Rock, or Steel type, the 50% boost to the Special Defense of Rock type pokemon, and because of a couple of abilities. The abilities are Sand Stream (causes an eternal sandstorm upon the pokemon switching into battle), Sand Veil (boosts evasiveness in a sandstorm), Sand Force (boosts the power of Rock, Ground, and Steel moves by 30% in a sandstorm), and Sand Rush (doubles speed in a sandstorm).
Trick Room: Trick Room teams have many slow but powerful pokemon such as bulky sweepers. Trick Room teams only thrive as long as Trick Room is active because without it the low Speeds become a major issue. Once a Trick Room team is set-up it can be very difficult for the usual fast pokemon to survive.
Here I will try to demonstrate some good team synergy, but of course even my teams are not perfect (they may even be far from it); hopefully though, it can still be helpful.
Here is a singles battle:
And here is a double battle:
Sorry no triples example, I don't really play triples very much but it shouldn't be too different from doubles. In my next post I will talk about Hold Items in depth.
The last piece to the stat puzzle are EVs. EVs as I briefly mentioned before are short for Effort Values which are hidden values for each stat that are gained along with experience in battle. Every time you defeat a pokemon in battle every one of your pokemon that got experience will get EVs as well, this applies even if they didn't actually participate in battle so in other words they get EVs if they were holding EXP Share. The amount of EVs your pokemon will receive depends on the defeated pokemon. Depending on the species defeated your pokemon will (normally) gain between 1 and 3 EVs in one of the six stats and on some occasions in more than 1 stat. Here are links to lists of pokemon based on what EVs they give: Pokemon who give HP EVs Pokemon who give Attack EVs Pokemon who give Defense EVs Pokemon who give Special Attack EVs Pokemon who give Special Defense EVs Pokemon who give Speed EVs
So what do EVs do and why are they important? Well for every 4 EVs in a particular stat a pokemon will gain 1 point in that stat at level 100. A pokemon may have up to 255 EVs in a single stat and up to 510 EVs total which means up to a 63 point boost in 2 stats at level 100. Hopefully you see that 63 points is quite a lot, a pokemon with the respectable base stat of 100 will have a stat ranging from 236 to 299 (assuming a neutral nature and an IV of 31) based on how many EVs they have. In other words EVs can give a boost of around 30% to 2 stats (or smaller boosts to more stats) making them more influential to your stats than IVs or natures. This is why there is a need to do EV training.
EV training is the manipulation of what stats get the boosts from EVs. Since we are limited to only 510 EVs for a pokemon we want to make sure we distribute them effectively. Here are two level 100 Alakazams one was EV trained (properly) the other was not.
Can you tell which is which? The one on the left was EV trained the one on the right was not. If you look you will see that the one that was not EV trained has 3 points more in HP, 17 points more in Attack, 14 points more in Defense, and 13 more points in Special Defense. That might sound pretty good, but look at the cost. The EV trained Alakazam has 38 more points of Special Attack and 40 points more in Speed, the stats that Alakazam utilizes the best. Why wouldn't you want to boost Alakazam's poor defenses you might ask? Well it is because no matter how much effort you put into his defenses they are only going to be mediocre at best, and if you wanted a defensive pokemon there are much better choices. Alakazam's strength lies in his speed and special attack, for him it is a matter of the best defense is a good offense. Alakazam won't take many hits no matter what so his best option is to try and power through the opponents pokemon before they can lay a finger on him.
Of Course other pokemon are different. Depending on their roles you will want to EV train them differently. Often you will put 252 EVs (252 not 255, 255 is not divisible by 4 so it would be wasteful to put more than 252 in a stat) in to two of the stats and use the remaining 4 on one of the remaining stats. This isn't always the case there are many situations that will call for you to spread the EVs across three different stats, but rarely would you want to spread them over four or more stats.
So how do we go about EV training? Well basically we just have to make sure that our pokemon only fight pokemon that give them the EVs we want. It is by far easiest to EV train a freshly caught pokemon or baby pokemon that has never been in battle since they will have a clean slate with 0 EVs, but it is not impossible to fix the EVs of a pokemon you have already trained. I only recommend this as a last resort because it is usually easier to just breed a new baby and start from scratch, but if that is impossible (eg. Legendary pokemon) then this is what you have to do. You have to collect several (15-20 would probably suffice, but you would need 26 of each to be certain) of each of these types of berries: Pomeg Berry for removing HP EVs, Kelpsy Berry for removing Attack EVs, Qualot Berry for removing Defense EVs, Hondew Berry for reducing Special Attack EVs, Grepa Berry for reducing Special Defense EVs, and Tamato Berry for reducing Speed EVs. The berries aren't particularly easy to get either, they are only available from the Dream World and can be a pain to find. Once you do find them it takes about three days for them to grow and give you more berries. But once you have them you can feed them to your pokemon until you get the message, "But (insert stat name) can't fall any further" or "It doesn't have any effect" from every type of berry. Each berry you feed to your pokemon will reduce the EVs of a particular stat by 10. It may seem like a good idea to not reduce the stats that you intend to increase, but because the EVs are a hidden value doing that will make it impossible to track them correctly. I guess it depends on how much of a perfectionist you are, you don't necessarily have to reduce them if you aren't worried about the 1 point stat loss (assuming you are doing a 252, 252, 4 spread) but if you want to truly maximize your pokemon's potential then you will want to completely zero out your pokemon's EVs. Once you have removed the EVs you can EV train these pokemon in the same way as any other pokemon.
As I said before to EV train all you need to do is fight only the pokemon who give you the EVs you want, but there are several ways to really expedite this process. First there are vitamins that grant your pokemon 10 EVs in a given stat. The upside to them is that they are extremely fast and easy to use; the down side is that they are expensive costing 9,800 poke dollars for one. The other downside is that they can only be used until your pokemon has 100 EVs in the given stat, so you are still going to have to do a fair amount of EV training. The vitamins are still really nice if you can afford them; you can buy them on route 9 from the Department store or you can win them in the Battle Subway where they cost 1 BP. The different vitamins are: HP Up for HP, Protein for Attack, Iron for Defense, Calcium for Special Attack, Zinc for Special Defense, and Carbos for Speed. There are two other rare (can't be bought) vitamins that have nothing to do with EVs but are still note worthy, these are PP UP which boosts the PP (number of uses) of a move by one and PP Max which boosts the PP of a move to 8/5ths the original.
Besides Vitamins there are the very similar wing items. The Health, Muscle, Resistance, Genius, Clever, and Swift wings they like vitamins increase the EVs of HP, Attack, Defense, Special Attack, Special Defense, and Speed respectively. The advantage that wings have over Vitamins is that they can be obtained for free and they are not restricted to the 100 EV boost limit that the Vitamins are. The disadvantage is that they give only 1 EV at a time making them extremely impractical. Anyways they can be found in shadows on the Driftveil Drawbridge and Marvelous Bridge. You may also find the Pretty Wing, but it is worthless so should just be sold.
Other than Vitamins and Wings there are also a few ways of increasing the number of EVs you get when defeating a pokemon. The simplist of these ways (and least effective) is to let the pokemon you are EV training hold the Macho Brace. The Macho Brace doubles the number of EVs the pokemon holding it receives after battle, it also halves speed but only while holding it whereas the EV effects are permanent. The Macho Brace can be obtained by talking to a man in the east gate to Nimbasa City.
Better than the Macho Brace are the 6 different Power items that I talked about in the last post. Besides being used to pass an IV down to a baby pokemon, the main use of the Power Items are for EV training. The Power items function similarly to the Macho Brace in that when you have a pokemon hold them that pokemon's speed is halved in battle but they gain more IVs. But unlike the Macho Brace the Power items give +4 EV bonus in the item's corresponding stat every time the pokemon gains EVs. The only downside to the Power items is that they are fairly difficult to obtain. Like I mentioned last post they are prizes in the Battle Subway and each one costs 16 BP.
The last thing is the incredibly rare Pokerus virus. Pokerus is a secret virus your pokemon can catch from fighting wild pokemon, but the odds of a pokemon having it is a frighteningly low 3 in 65536 chance meaning you either have to get incredibly lucky or else know someone who is incredibly lucky to get it. Despite being a virus and showing up on your pokemon's status screen where any other status ailment would, Pokerus is not bad and actually it is quite good. A pokemon with the Pokerus virus will gain twice the EVs of a pokemon without it. The best part about this is that it stacks with the EV boosting items, so if your pokemon is holding a Power item, has Pokerus and then defeats a pokemon that gives 1 EV it will get (1 + 4) X 2 or 10 EVs. That means you can potentially make the process of EV training 10 times faster than normal.
If you are lucky enough to get the Pokerus virus it needs to be handled with care because the pokemon that has it will become immune to it in one or two days. While Pokerus appears like a status condition it is in its contagious stage. While in the contagious stage if you use the infected pokemon in battle there is a chance it will spread the virus to your other pokemon (which is good). But after a day or two it will stop being contagious and the status mark will be replaced by a little smiley face. Once that happens it is no longer possible to spread the Pokerus virus, but the positive effects will remain on the pokemon. Fortunately there is a way to preserve the virus, by depositing an infected pokemon in the PC it will stay infected indefinitely. Pokerus only disappears at midnight so you just have to make sure that at midnight you always have at least one infected pokemon in your PC.
Active Pokerus:
Cured Pokerus:
So all that is left is to just do it. Remember that you have to track your EVs yourself because there is no way to check them. Finally, here are some of the best places to EV train your pokemon.
For HP: Icirrus City is good while surfing on the water. If you surf you will only find Stunfisk which gives 2 HP EVs and rarely in dark spots you will find Seismitoads that give 3 HP EVs. You can also walk in the shallow water around here to find mostly Stunfisks and Palpitoads which both give 2 HP EVs, but you will also see Shelmets who give 1 Defense EV.
For Attack: Dragonspiral Tower is the place to go. Here you will only run into Goletts and Mienfoos who give 1 Attack EV as well as Druddigons who give two Attack EVs.
For Defense: There isn't really that great of a place for defense, but I guess Wellspring Cave. You have a 50% chance of fighting Roggenrola who gives 1 Defense EV. Run from all other fights.
For Special Attack: Celestial Tower is best. You will only run into Litwicks and Elgyems which both give 1 Special Attack EV.
For Special Defense: Route 4 surfing (this may work at a few other spots too). If you avoid the Dark spots you will only run into Frillish who gives 1 Special Defense EV. If you hit the dark spots you will most likely fight Alomomola who gives 2 HP EVs.
For Speed: Surf in Striaton City (again may work in some other places too). You should only find Basculins that give 2 Speed EVs.
Here is a short demonstration of EV training.
That wraps up EV training. Not sure what my next post will be, but I'm thinking probably Team building.
For this post I would like to talk about breeding Pokemon, but first I need to explain what we are breeding for and that is Pokemon with ideal stats. Every Pokemon has six stats that affect its performance in battle. These stats are:
Health Points (or usually just HP): The amount of damage a pokemon can take before being knocked out. The pokemon capable of the highest HP in the game is Blissey who can reach a colossal HP of 714.
Attack: The higher the Attack stat the more damage the pokemon can deal with physical attacks. The pokemon with the greatest attack power is Attack form Deoxys whose Attack stat can reach 504.
Defense: The higher the Defense stat the less damage the pokemon will take from physical attacks. The pokemon with the best defense in the game is Shuckle whose defense can be as high as 614.
Special Attack: The higher the Special Attack stat the more damage the pokemon deals with special attacks. The pokemon with the highest special attack again happens to be Attack form Deoxys who again reaches to a special attack of 504.
Special Defense: Probably obvious by now, but the higher this stat is the less damage the pokemon will take from special attacks. Coincidentally the pokemon with the highest Special Defense is also Shuckle who this time reaches a special defense of 614.
Speed: The speed of a pokemon determines which pokemon will move first in a battle. Under normal conditions the pokemon with the highest speed will move first, but the use of a priority move will allow a slower pokemon to move first. Also the move Trick Room will make slower pokemon move first for five turns. The pokemon with the best Speed stat is Speed form Deoxys who can reach a speed of 504.
A pokemon's growth in any particular stat is determined by 4 things; Base stats, Effort Values (EVs), Individual Values (IVs), and Nature. The base stats are determined by the species of the pokemon and therefore is the only part we cannot influence. The reason why Attack Deoxys for instance can reach an Attack and Special Attack of 504 is because it has a base stat of 180 in both, but the down side is that Attack Deoxys has a base Defense and Special Defense stat of only 20 which means at most it could have a Defense of 152. Most pokemon are not this polarized though, usually a Pokemon's stats will be much more evenly distributed. The Pokemon with the greatest combined stat total is Arceus (the literal god of the pokemon universe) every one of his stats has a base of 120. Here is a look at a level 100 Arceus and what its stats are like.
Next would be EVs (effort values) which are gained along with experience, but I will skip talking about these for now because they are dealt with after breeding and will probably be the subject of my next post. Instead I will explain IVs (individual values) which are determined at the pokemon's birth. An IV is a (somewhat) random number between 0 and 31 that affects the growth of a stat with 0 being generally bad because it causes poor growth and 31 usually considered good because of the increased growth. Each IV point translates to 1 point in its respective stat at level 100, so an otherwise perfect Attack Deoxys with an IV of 0 for Attack will only have an attack of 473 compared to the perfect Attack Deoxys with an Attack IV of 31 who will have an attack of 504. A wild pokemon will have a random IV for each of the 6 stats, meaning the odds of finding a perfect IV pokemon in the wild is 1/32 to the 6th power or less than 1 in a billion. This is where breeding comes in because a pokemon hatched from an egg will inherit 3 of its parents' stats making finding a good pokemon much easier. There are ways to manipulate this further, but first I need to talk about Natures.
Note: Even though this is a beginners guide IV breeding is a fairly advanced technique that even many competitive players do not take the time to do. In other words IV breeding is not essential to playing Pokemon competitively, but it will give you an edge. Natures on the other hand are very important.
Every pokemon you catch or breed will have 1 of 25 Natures. Like IVs this is usually completely random, but through breeding (Also the ability Synchronize) it is possible to drastically increase the odds of getting the nature you desire. The reason a pokemon's nature is so important is that based on their nature one stat will be increased by 10% while another is decreased by 10%. There is a nature for every possible pair of stats including 5 neutral natures where the stat being decreased is also the one being increased resulting in no effect. Here is a chart of what the different natures do, note that there are no natures that increase or decrease HP. In-game you can see what a nature does by checking a pokemon's stats, the stat highlighted in blue is the stat decreased while the one in red is increased.
Usually, but not always, you will want a nature that either decreases Attack or Special Attack. The reason for this is that most pokemon will only use either physical or special attacks meaning the other attack stat is unimportant and so perfect for taking the reduction. The notable exceptions to this rule are pokemon who are intentionally slow, usually for the purpose of being used with Trick Room (This is also one of the few reasons someone would want a lower IV), in these cases a speed lowering nature could be used. The other exception is for mixed attackers, pokemon who use both physical and special attacks, for these pokemon a defense, special defense, or speed reducing nature could be used. There are few if any situations where you would want to use a neutral nature; they may not be the worst possible nature, but there is almost always a stat that could use the 10% boost.
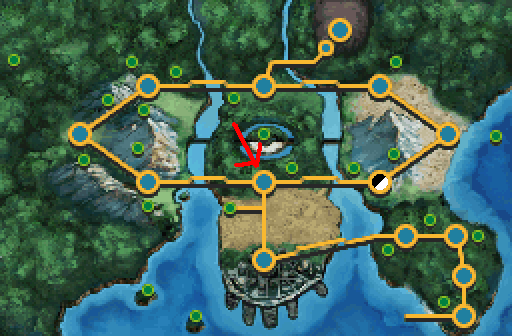
Finally it is time to breed. All you need to do to breed pokemon is take a male and female pokemon from the same egg group and put them in the Daycare on route 3 together. Click here to see which Pokemon are in which egg groups. And the Daycare is where the red arrow is pointing:
You can also breed any pokemon that is not in the no egg group with a Ditto in order to get an egg of the non-Ditto pokemon; however, you can not breed two Dittos to get a Ditto egg and you can never breed the pokemon in the no egg group. When breeding the offspring will always be the same species as the mother except for when breeding a male with a Ditto.
Now that we are ready to breed here is what you need to take into consideration when choosing the parents:
1. This one is obvious, you need to have a female of the type of pokemon you wish to breed or a male with a Ditto.
2. The IVs of the parents, as I said earlier the baby pokemon will inherit 3 random IVs from its parents so the more good IVs they have the better. Unfortunately the IVs of a pokemon are hidden values so it can be tricky to determine what they are. It is easiest if the pokemon has not been used in battle because then it will not have any EVs to throw off its stats and you can simply enter its level, nature, and stats into this calculator http://veekun.com/dex/gadgets/stat_calculator. This calculator becomes less accurate at lower levels so if necessary you can bring pokemon to the building left of the Pokemon Center in Nimbasa City to enter a battle where they will temporarily be raised to level 50 (this can only be done after completing the game).
You may want to save before entering battle so that you can reset the game after you check the pokemon's stats. Once in battle check the stats of the pokemon and enter them into the IV calculator to get their IVs accurate within 1 point. This is the same method we will use to check the IVs of newly hatched pokemon. There is also a man in Nimbasa City that will judge the potential of your pokemon, he can be found in the Battle Subway, but also only after completing the game.
First he will rate your pokemon based on its total number of IVs.If the IV total is between 0 and 90 he will say, "This
Pokemon's potential is decent all around." If the IV total is between 91
and 120, "This Pokemon's potential is above average overall." If the
IV total is between 121 and 150, "This Pokemon has relatively superior
potential overall." If the IV total is between151 and 186, "This
Pokemon has outstanding potential overall." And then he will tell you what
stat your pokemon has the best IV in as well as how good it is. If the pokemon's highest IV is between 0 and 15 he will say, "It's rather
decent in that regard." If the highest IV is between 16 and 25, "It's
very good in that regard." If the highest IV is between 26 and
30, "It's fantastic in that regard." If the highest IV is 31, "It
can't be better in that regard.". Through those two methods you should be able to get at least a good idea of what your pokemon's IVs are like. The first method is usually more precise, but the second method is easier and can be used even if you don't know the pokemon's EVs.
When breeding you can let one of the parents hold a Power Weight, Power Bracer, Power Belt, Power Lens, Power Band, or Power Anklet to almost guarantee the baby will have the same HP, Attack, Defense, Special Attack, Special Defense, or Speed IV respectively. So if one of the parent pokemon has an HP IV of 31 you can let it hold a Power Weight to make the baby also have an HP IV of 31; however, you cannot make both parents hold Power Items to lock-in two IVs. The 6 Power Items are won as rewards from the Battle Subway in Nimbasa City, so they are fairly difficult to get.
3. Now back on track, the third thing to consider when selecting parents are their natures. You want at least one of the parents to have the nature you wish the baby to have so that you can pass it on. In order to pass on the nature of the parent to the baby pokemon you must give the parent an Everstone to hold before breeding. By holding the Everstone there is a 50% chance that the baby will have the same nature as the parent. There are several places to find Everstones so you will most likely find one through the course of the game.
4. Dream World abilities. The Dream World is something I haven't mentioned yet, but it is a website you sync your Pokemon game to. In the Pokemon Dream World you can grow berries, decorate your house, and play mini-games with pokemon. By playing these mini-games you can befriend pokemon that can be then be sent back to your game. These pokemon usually have a special Dream World Ability that is different from the abilities they can usually have. If you breed a female pokemon with a Dream World ability then there is about a 60% chance the baby pokemon will also get the Dream World ability. This is only something you need to worry about if you want the baby to have the Dream World ability. A few of the pokemon with notable Dream World abilities are Vulpix, Poliwag, and Dratini (well actually it is their evolved forms that benefit but they are the ones you want to find). There are others who benefit as well, but for many pokemon it doesn't matter. Here is the website, but you have to set-up an account first to use it: http://en.pokemon-gl.com/
5. The Last thing you might consider is egg moves. There are some moves a pokemon can only learn if their father had it while breeding. The egg moves a pokemon can learn vary from species to species so I can't possibly put them all here, but be sure to know if your pokemon needs an egg move before you breed it because it will be impossible to teach it the move later.
Once you have selected the parents you can breed. Here are a few final tips about breeding:
When breeding try to have a pokemon with the ability Flame Body in your team at all times. Having a pokemon with Flame body will double how fast eggs hatch. Here is a list of pokemon with the ability Flame Body http://veekun.com/dex/abilities/flame%20body. The ability Magma Armor works the same too, but only Camerupt, Slugma, and Magcargo have that ability, the latter two also capable of having Flame Body.
How much the parent pokemon like each other determines how quickly they will produce eggs. The pokemon will "get along very well" if they have different original trainers and are the same species; these pokemon will create eggs the fastest. If they are the same species but have the same trainer, or are different species with different trainers then they will "get along" and produce eggs reasonably fast. If the pokemon species are different and the trainer is the same then they "won't seem to like each other" and will produce eggs slowly. If the pokemon are not in the same egg group, in the no egg group, or the same gender no eggs will be produced.
There is a long stretch of road right outside of the Daycare. When breading it is easiest to ride your bike back and forth on this path while you wait to get eggs and while you wait for them to hatch (eggs hatch based on steps not actually time). It is one of the largest stretches in the game and the Daycare man will call to you when your pokemon has had an egg.
Once you hatch a couple of good looking pokemon you can check their IVs using the previously mentioned methods and then train the best one of the litter.
But enough talking about it here is how it is actually done (The Video player is really small for some reason, you should expand the video or else you won't be able to see my messages properly):
And that finally wraps up my explanation on Pokemon breeding. My next post will be a much shorter explanation on how to EV train Pokemon.